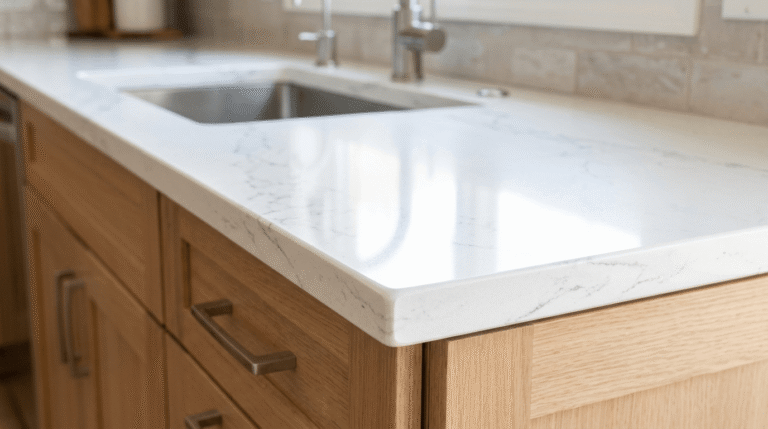
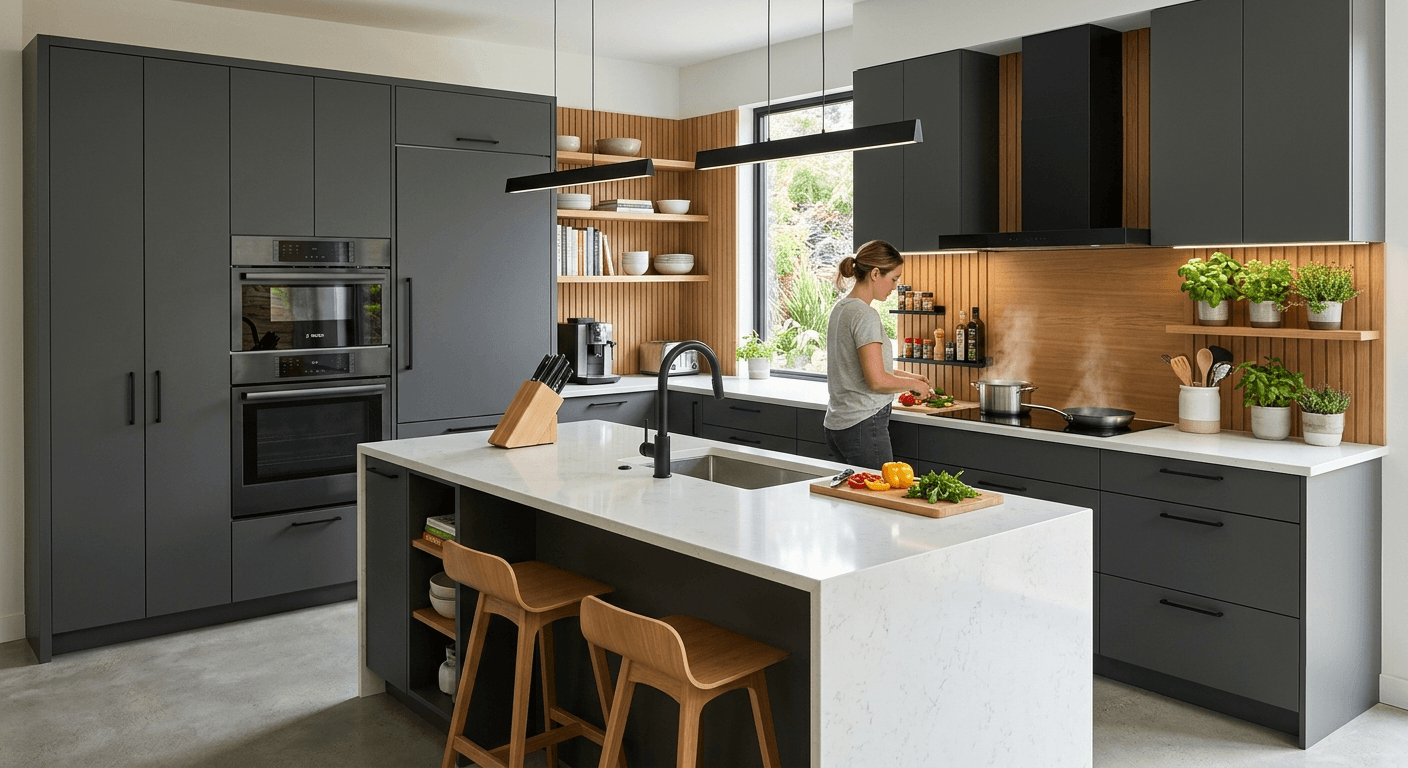
A kitchen layout determines how a household prepares food, stores equipment, and moves through the room during daily tasks. The layout controls the position of the sink, stove, refrigerator, cabinetry, and countertop space relative to one another and to the rest of the home. A well-planned layout reduces unnecessary movement between work zones and creates enough clearance for one or more people to work at the same time.
Kitchens generally follow one of six recognized layout types: one-wall, galley, L-shaped, U-shaped, G-shaped, and island layouts. Each type suits a different room size, traffic pattern, and cooking style. A narrow galley kitchen serves a single cook efficiently, while an island layout supports multiple people and open-concept living. Room dimensions, doorway placement, and plumbing or electrical locations often narrow the realistic options for a given space.
Layout selection also depends on the kitchen work triangle, which connects the sink, stove, and refrigerator into an efficient work path, and on clearance requirements around counters, islands, and seating areas. Standard measurements from kitchen design guidelines define minimum walkway widths, counter heights, and aisle clearances that keep a kitchen functional and code-compliant.
This article explains each kitchen layout type, the work triangle principle, layout options by room size, island and peninsula placement, open-concept versus closed layouts, dining and living-space integration, common layout mistakes, and a process for choosing the right layout for a specific space.
What Is a Kitchen Layout?
A kitchen layout is the arrangement of cabinetry, appliances, countertops, and work zones within a kitchen’s floor plan. The layout defines the position of the sink, stove, refrigerator, and storage in relation to the room’s walls, doorways, and traffic paths.
The layout organizes a kitchen into distinct zones, including a preparation zone, a cooking zone, a cleaning zone, and a storage zone. Each zone requires countertop space, appliance access, and clearance for a person to work without obstruction. The relationship between these zones affects how efficiently a cook moves between tasks such as retrieving ingredients, washing produce, and cooking.
A kitchen layout applies to residential kitchens of any size, from compact apartment kitchens to large multi-cook kitchens in single-family homes. The room’s dimensions, wall configuration, window and door placement, and existing plumbing or gas lines typically determine which layout types are structurally practical for a given space.
The 6 Main Types of Kitchen Layouts
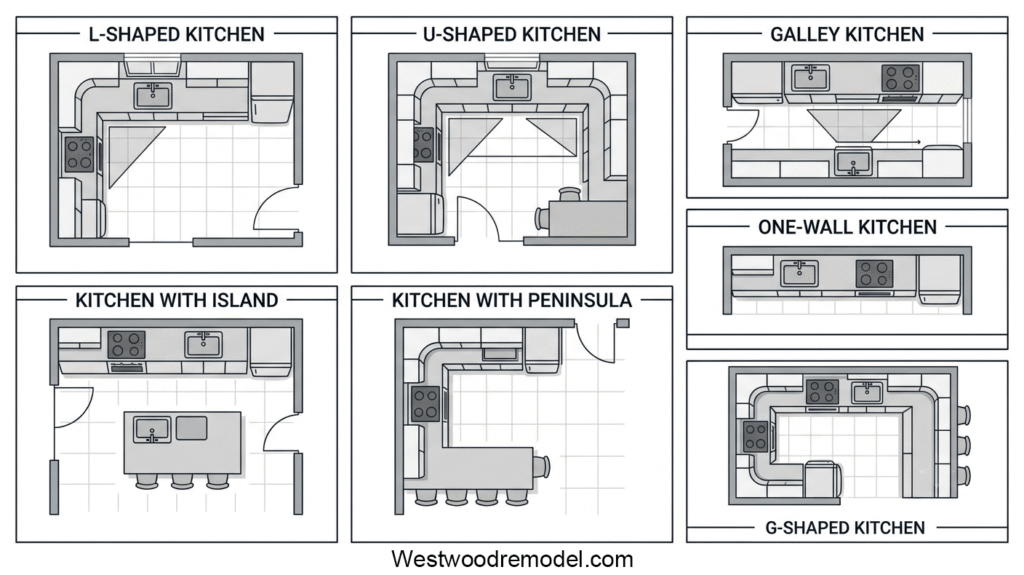
The six main kitchen layout types are one-wall, galley, L-shaped, U-shaped, G-shaped, and island layouts. Each type differs in the number of walls used for cabinetry and appliances, the shape of the resulting work area, and the amount of floor space required.
The classification criteria for these layout types include the number of walls with fixed cabinetry, the geometric shape of the counter run, and whether the layout includes a freestanding island or attached peninsula. A one-wall layout places all appliances and storage along a single wall, while a U-shaped layout uses three connected walls to enclose the work area. Island and G-shaped layouts add a freestanding or partially freestanding element to a base configuration.
Each layout type suits different room dimensions and household needs. A one-wall or galley layout fits a narrow or compact room, while L-shaped, U-shaped, G-shaped, and island layouts require more floor area to accommodate the additional counter runs or the island itself.
One-Wall (Single-Wall) Kitchen Layout
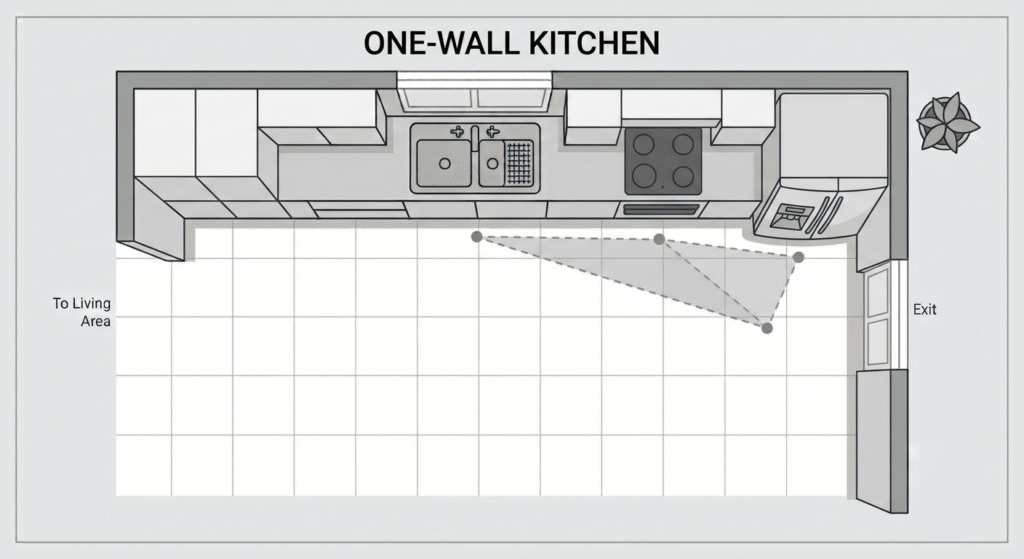
A one-wall kitchen layout places the sink, stove, refrigerator, and all cabinetry along a single continuous wall. This layout suits studio apartments, small homes, and open-concept spaces where the kitchen shares a room with a living or dining area.
The layout arranges appliances and storage in a single linear run, which limits counter space compared with multi-wall configurations. A one-wall kitchen typically requires a minimum width of 8 feet to fit a functional sequence of refrigerator, counter, sink, counter, and stove. Because every element sits on one wall, the layout removes the enclosed work triangle found in multi-wall kitchens and instead relies on a linear workflow between zones.
This layout suits a single cook working in a compact space. A narrow room, a studio apartment, or an open-plan living area with a defined kitchen wall are common applications. Limited counter and storage space are the primary constraints of this layout compared with L-shaped or U-shaped alternatives.
Galley (Corridor) Kitchen Layout
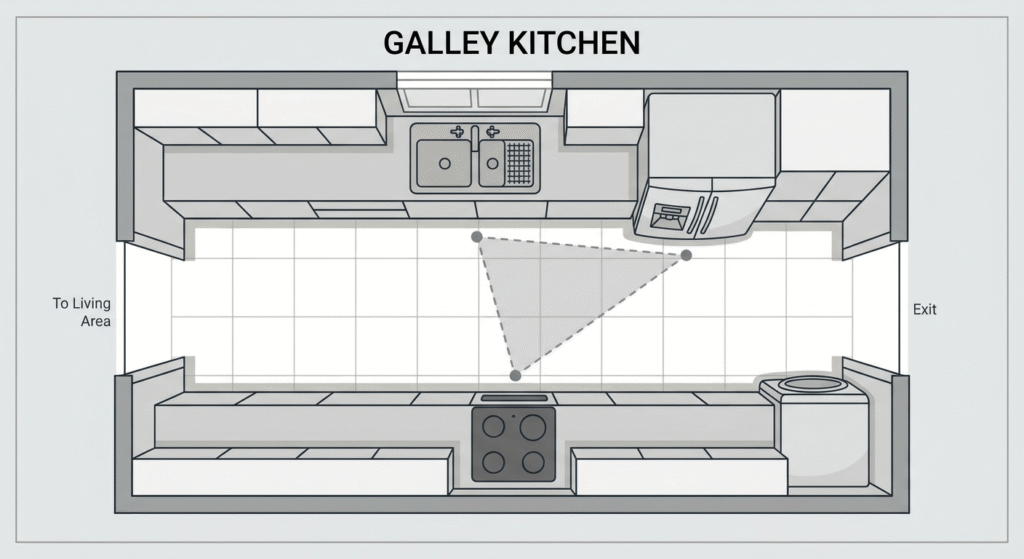
A galley kitchen layout, also called a corridor kitchen, places two parallel counter runs along opposite walls with a walkway between them. This layout suits narrow rooms and is common in apartments, townhouses, and older homes.
The two counter runs typically divide the primary work zones, with the sink and stove on one side and the refrigerator and additional storage on the other. Industry design guidelines recommend a minimum aisle width of 42 inches for a single-cook galley kitchen and at least 48 inches when two people work in the space at the same time. A galley kitchen with only one open end functions as a single-entry corridor, while a galley open at both ends allows through traffic.
This layout suits narrow spaces where a wider footprint is not available, including apartment kitchens, rental units, and hallway-adjacent kitchens. A galley layout with a single entry point can create a bottleneck when two people work simultaneously, and the parallel walls generally exclude space for a central island.
L-Shaped Kitchen Layout
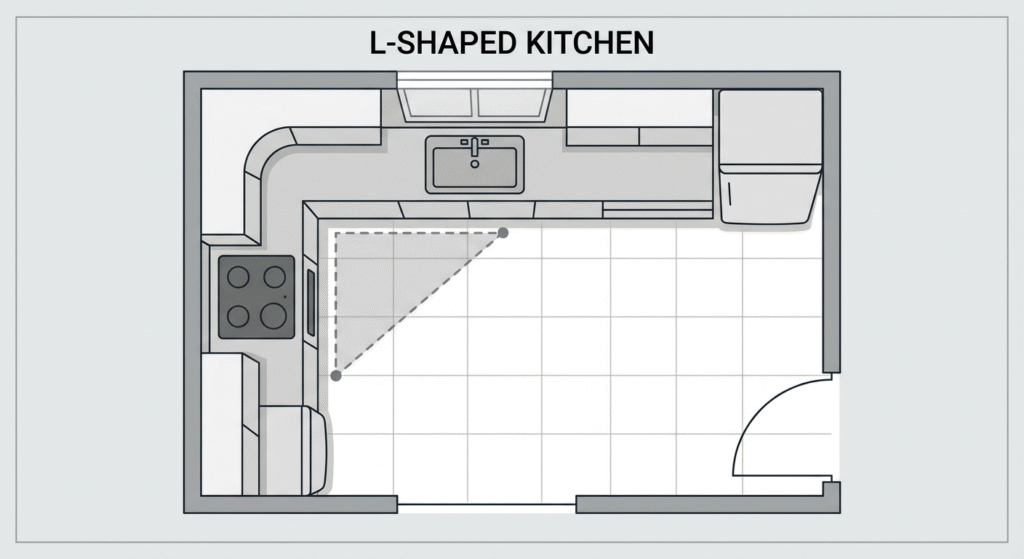
An L-shaped kitchen layout places cabinetry and appliances along two adjacent walls that meet at a 90-degree corner, forming an L shape. This layout is common in small to mid-sized kitchens and suits both closed and open-concept rooms.
The two connected counter runs create a continuous work surface around the corner, which keeps the sink, stove, and refrigerator within a compact triangular path. The open side of the L allows the kitchen to connect to an adjacent dining or living area without a fourth wall enclosing the space. An L-shaped layout can accommodate a small island or a dining table in the open floor area when the room has sufficient depth.
This layout suits kitchens that open into a living or dining space and households that want a functional work triangle without a fully enclosed room. The corner cabinet formed at the junction of the two walls typically requires a lazy Susan, corner drawer system, or blind-corner pull-out to remain fully usable.
U-Shaped Kitchen Layout
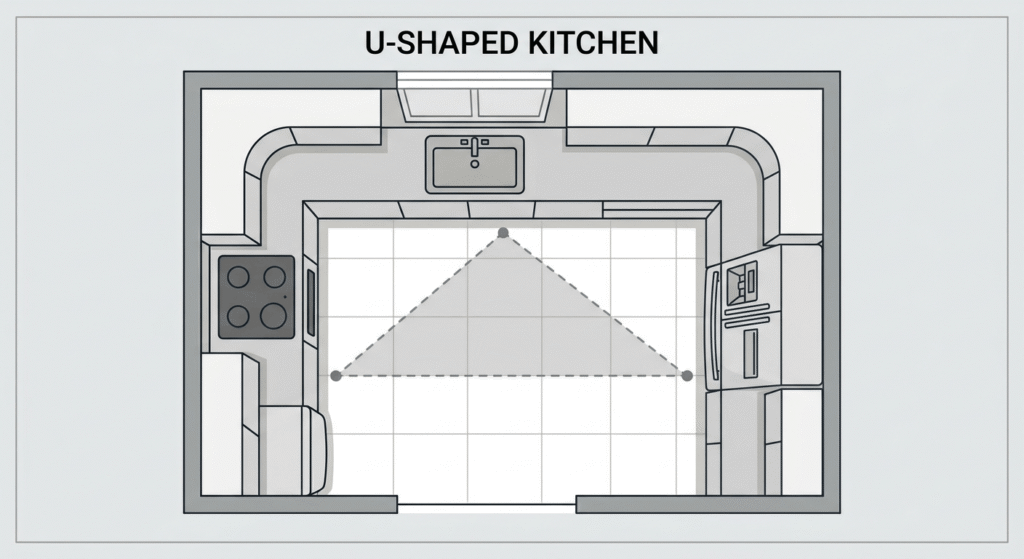
A U-shaped kitchen layout places cabinetry and appliances along three connected walls, enclosing the work area on three sides. This layout provides more counter and storage space than one-wall, galley, or L-shaped configurations of a similar room size.
The three-wall arrangement typically distributes the sink, stove, and refrigerator across separate walls, which keeps each element within reach of the others while maximizing continuous counter length. A U-shaped kitchen requires a minimum width of approximately 8 feet across the open end to maintain a functional aisle between the three counter runs. The two corners formed by the layout each require corner-cabinet storage solutions similar to those in an L-shaped kitchen.
This layout suits mid-sized to large kitchens and households that need extensive counter and cabinet space. A U-shaped kitchen without sufficient width can create a cramped aisle, so the layout is less suitable for narrow rooms than a galley or one-wall alternative.
G-Shaped (Peninsula) Kitchen Layout
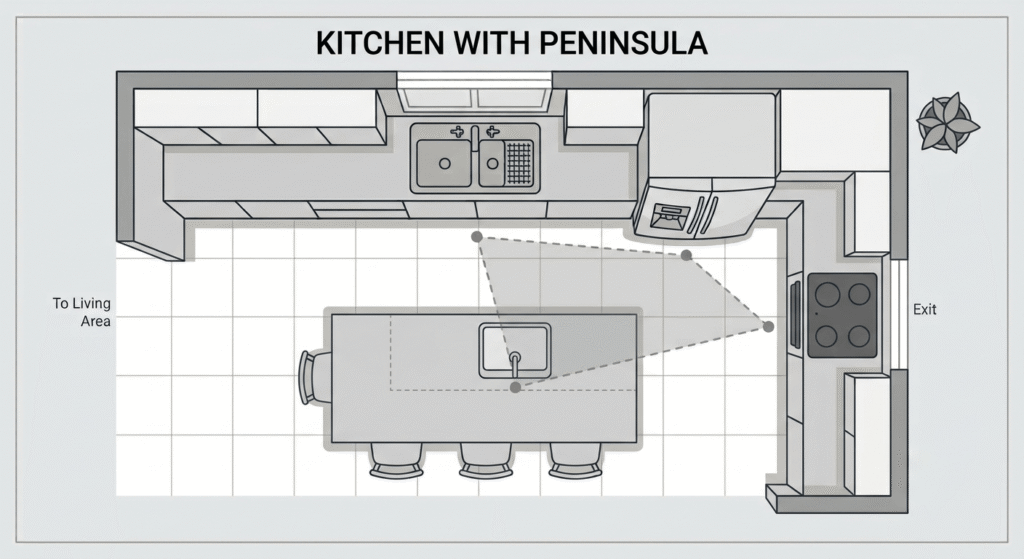
A G-shaped kitchen layout extends a U-shaped configuration with a peninsula, a fourth partial counter run that connects to one end of the U without fully enclosing the room. This layout forms a shape resembling the letter G.
The peninsula adds counter space, storage, or seating while remaining structurally attached to the main cabinetry run, unlike a freestanding island. A G-shaped layout typically provides more total counter length and storage capacity than a U-shaped layout of the same room footprint. The peninsula can separate the kitchen’s work area from an adjacent dining or living space while keeping the room visually connected.
This layout suits larger kitchens where additional seating or storage is needed but a freestanding island is not structurally or spatially practical. The peninsula’s fixed connection to the wall reduces the clearance required around it compared with a freestanding island, since traffic only needs to pass on the open sides.
Island Kitchen Layout
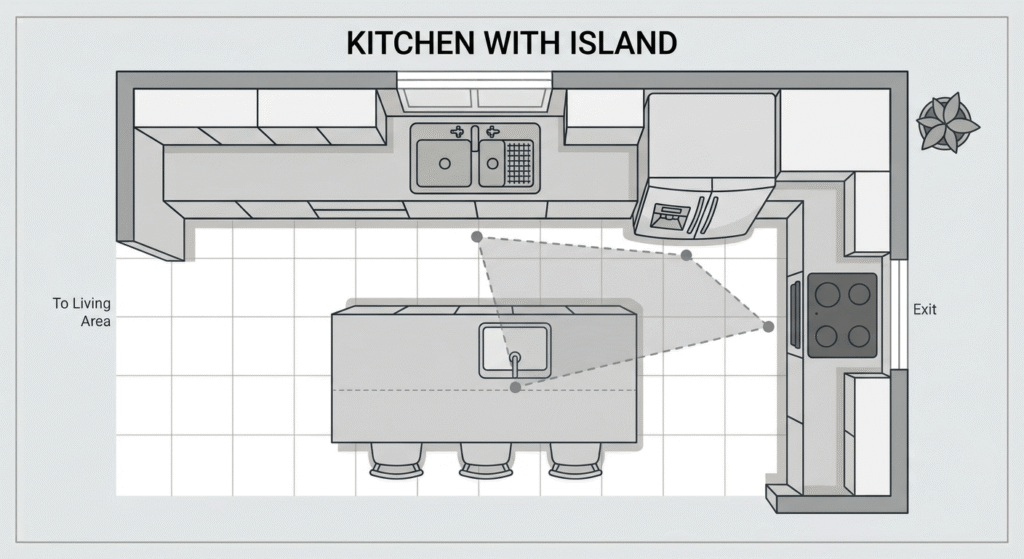
An island kitchen layout adds a freestanding counter unit, called an island, at the center of the room, separate from the main wall cabinetry. This layout applies to L-shaped, U-shaped, or larger one-wall kitchens with sufficient floor area.
The island typically provides additional counter space, storage, or seating, and can house a secondary sink, cooktop, or prep area depending on the room’s plumbing and electrical layout. An island requires clearance of at least 42 inches on all sides for walkways, increasing to 48 inches or more where the island includes seating, to allow a person to sit at the counter while another person passes behind. Industry guidelines generally recommend a minimum room width of about 13 feet to fit a functional island alongside surrounding counters and aisles.
This layout suits kitchens with an open floor plan and enough square footage to accommodate the island’s footprint and clearance requirements. A kitchen with insufficient width can make an island layout impractical, since inadequate clearance restricts movement and reduces the functional benefit of the added counter space.
The Kitchen Work Triangle Explained
The kitchen work triangle is a design principle that connects the sink, stove, and refrigerator with three imaginary lines, forming a triangular path between the kitchen’s primary work zones. The principle originated from mid-20th-century kitchen efficiency studies and remains a reference standard in residential kitchen design.
The triangle concept aims to minimize the walking distance between the three most frequently used appliances during food preparation and cooking. Design guidelines commonly recommend that each side of the triangle measure between 4 and 9 feet, with a combined perimeter of no more than 26 feet. A triangle with sides that are too short can crowd the work area, while a triangle with sides that are too long increases unnecessary movement during cooking tasks.
The work triangle applies most directly to one-cook kitchens with a defined path between the three zones. Layouts with multiple cooks, large islands, or open-concept designs often replace the strict triangle model with multiple smaller work zones instead of a single triangular path.
Why the Sink, Stove, and Fridge Placement Matters
The sink, stove, and refrigerator placement matters because these three appliances handle the highest-frequency tasks during food preparation, including washing, cooking, and retrieving ingredients. Placing them within an efficient path reduces the number of steps a cook takes during a typical meal.
Each appliance serves a distinct function in the triangle: the refrigerator supplies ingredients, the sink handles washing and disposal, and the stove performs cooking. Placing these three points too far apart increases physical strain and preparation time, while placing them too close together can restrict counter space between zones. Traffic paths that cross through the triangle, such as a main walkway or doorway, disrupt the work sequence and increase the risk of collisions between people using the kitchen.
Correct placement also affects safety, since a shorter distance between the stove and sink reduces the risk of spills or burns while transporting hot cookware. A refrigerator positioned near the kitchen’s entry point allows access without crossing the active cooking zone.
Work Triangle Rules for Small vs. Large Kitchens
A small kitchen generally requires a compact work triangle with each leg close to the 4-foot minimum, since limited floor space leaves little room for longer walking paths. A large kitchen can support a work triangle closer to the 9-foot maximum per leg without exceeding the recommended 26-foot total perimeter.
In small kitchens, the work triangle often overlaps with the room’s entire floor area, so appliance placement must also account for door swings, cabinet clearance, and walkway width. In large kitchens, particularly U-shaped, G-shaped, and island layouts, designers frequently supplement the traditional triangle with secondary work zones, such as a baking station or a beverage area, positioned outside the core triangle to avoid an oversized or inefficient path.
Kitchen Layouts by Room Size
Room size directly limits which kitchen layout types are structurally practical and affects the specific dimensions used within a chosen layout. A compact room generally restricts the kitchen to a one-wall or galley configuration, while a larger room can accommodate an L-shaped, U-shaped, G-shaped, or island layout.
Standard design guidelines define minimum widths, aisle clearances, and counter lengths for each room size category. These measurements determine whether a given layout will function without crowding or restricting movement between work zones.
Small Kitchen Layout Ideas
Small kitchens generally suit one-wall, galley, or compact L-shaped layouts, since these configurations require less floor area than U-shaped, G-shaped, or island layouts. A small kitchen is typically defined as a room under approximately 70 square feet.
A one-wall layout maximizes floor space in a small kitchen by consolidating all appliances and storage along a single wall, leaving the remaining floor area open for movement or a small dining table. A galley layout suits a small kitchen with sufficient length but limited width, provided the aisle meets the minimum 42-inch clearance. A compact L-shaped layout can fit a small kitchen when the room includes a corner, allowing two shorter counter runs instead of one long run.
Vertical storage, including wall cabinets extending to the ceiling and pull-out organizers, helps offset the reduced counter and cabinet footprint typical of small kitchens. A small kitchen generally cannot accommodate a freestanding island, since the required clearance exceeds the available floor space.
Large Kitchen Layout Ideas
Large kitchens generally suit U-shaped, G-shaped, or island layouts, since these configurations use the additional floor area to provide more counter space, storage, and clearance. A large kitchen is typically defined as a room exceeding approximately 200 square feet.
A U-shaped layout in a large kitchen provides three connected counter runs with enough width to maintain a functional aisle between them. A G-shaped layout adds a peninsula to the U-shaped configuration, increasing counter and seating space without requiring the additional clearance a freestanding island needs. An island layout in a large kitchen can include a secondary sink, cooktop, or seating area, provided the room maintains the minimum clearance of 42 to 48 inches around the island.
Large kitchens often separate the room into multiple work zones beyond the traditional work triangle, such as a baking zone, a beverage station, or a secondary prep area, to accommodate multiple people working simultaneously.
Standard Kitchen Dimensions and Measurements
Standard kitchen dimensions include a countertop height of 36 inches, a counter depth of 24 to 25 inches, and a minimum walkway clearance of 42 inches for single-cook traffic, increasing to 48 inches for two-cook traffic. These measurements form the baseline used across most residential kitchen layouts.
Upper cabinets are typically installed 18 inches above the countertop, with a standard cabinet depth of 12 inches. Base cabinets typically measure 24 inches deep and 34.5 inches high before the countertop is added, bringing the total counter height to approximately 36 inches. Island clearance requires a minimum of 42 inches on all sides, increasing to 48 inches or more where the island includes seating, to allow simultaneous foot traffic and dining use.
Doorway width, appliance width, and outlet placement also factor into standard kitchen measurements. Local building codes may specify additional requirements for electrical outlet spacing, ventilation, and accessibility clearances that vary by jurisdiction.
Kitchen Island and Peninsula Placement
Kitchen island and peninsula placement determines how much additional counter space, storage, or seating a layout can support without restricting movement through the room. An island is a freestanding unit accessible from all sides, while a peninsula connects to the main cabinetry run on one end.
Both elements extend a base layout, such as an L-shaped or U-shaped configuration, by adding a work surface outside the primary counter run. Placement depends on the room’s total width, the location of existing plumbing and electrical lines, and the required clearance around the added element.
When to Choose an Island vs. a Peninsula
An island suits a kitchen with enough floor space to provide at least 42 inches of clearance on all sides, while a peninsula suits a kitchen with limited width where a connected counter run requires less surrounding clearance. The choice depends primarily on available square footage.
An island functions as a freestanding element, allowing traffic to pass on every side, which requires a larger total room footprint. A peninsula attaches to the existing cabinetry, so clearance is only necessary on the open sides, making it a practical option for narrower kitchens or rooms with an irregular shape. A peninsula can also serve as a partial divider between the kitchen and an adjacent dining or living area without fully separating the two spaces.
Plumbing and electrical costs also influence the choice, since relocating a sink or cooktop to a freestanding island typically requires more extensive rerouting than extending a connected peninsula from the existing wall run.
Clearance and Seating Requirements
Clearance requirements for an island or peninsula start at 42 inches for walkway space and increase to 48 inches or more where the counter includes seating. Seating areas require additional depth to accommodate a person seated at the counter while another person passes behind.
A standard counter-height island seating area requires approximately 24 inches of counter width per seat, with 12 inches of counter overhang to provide knee clearance. A bar-height counter, typically 42 inches tall, uses stools instead of standard dining chairs and requires a similar per-seat width allowance. Local accessibility codes may specify additional clearance for wheelchair access in kitchens designed to accommodate mobility devices.
Open-Concept vs. Closed Kitchen Layouts
An open-concept kitchen layout removes or minimizes walls between the kitchen and adjacent living or dining areas, while a closed kitchen layout encloses the kitchen within its own walls and doorway. The choice affects sightlines, noise transfer, and how the kitchen functions during social gatherings.
An open-concept layout allows natural light and sightlines to pass between the kitchen and connected rooms, which supports interaction between the cook and guests or family members in adjacent spaces. This layout typically requires structural modification when converting an existing closed kitchen, since load-bearing walls may need a support beam to remove safely. Open-concept kitchens also transfer cooking odors, noise, and visual clutter into the connected living space more readily than a closed layout.
A closed kitchen layout contains cooking activity, odors, and noise within a defined room, which suits households that prioritize a separate, contained work area over sightlines to adjacent rooms. A closed layout also allows for a fully enclosed U-shaped or G-shaped configuration without needing to leave one side open for room flow. The choice between open and closed layouts depends on household priorities regarding entertaining, noise containment, and the structural feasibility of removing existing walls.
Kitchen Layouts for Dining and Living Spaces
Kitchen layouts that connect to dining and living spaces integrate the work triangle and counter runs with an adjacent eating or gathering area. This integration affects traffic flow between the kitchen’s functional zones and the connected space’s furniture arrangement.
The layout’s connection point, whether through an open doorway, a peninsula, or a fully open floor plan, determines how much the kitchen and adjacent room share sightlines, lighting, and circulation paths.
Eat-In Kitchen Layouts
An eat-in kitchen layout includes a dedicated dining area, such as a table or a banquette, within the kitchen’s own floor space rather than in a separate dining room. This layout suits households that use the kitchen as a primary gathering space for daily meals.
The dining area in an eat-in kitchen typically sits outside the core work triangle to avoid interfering with active cooking and cleaning zones. An eat-in kitchen requires additional floor area beyond the standard layout footprint, since the table and chairs need clearance separate from the counter and appliance aisles. This layout commonly pairs with L-shaped or U-shaped configurations, where the open side of the layout accommodates the table.
Kitchen-to-Living-Room Flow
Kitchen-to-living-room flow describes how a kitchen layout connects visually and physically to an adjacent living room, typically through an open floor plan or a peninsula that partially separates the two spaces. This flow affects how the kitchen functions during gatherings that extend beyond the kitchen itself.
A layout with strong flow to the living room generally positions the island or peninsula to face the living area, allowing the cook to interact with people in the connected room while working. Sightlines between the two spaces influence furniture placement, lighting design, and flooring transitions, since an open flow layout often uses consistent flooring and ceiling treatments across both rooms. A closed or partially closed layout limits this flow by maintaining a wall or doorway between the kitchen and living room, which contains kitchen activity within its own space.
Common Kitchen Layout Mistakes to Avoid
Common kitchen layout mistakes include placing the work triangle too far apart, insufficient walkway or island clearance, poor traffic flow through the work zone, inadequate storage planning, and ignoring existing plumbing or electrical constraints.
An oversized work triangle, with a combined perimeter exceeding the recommended 26 feet, increases unnecessary walking distance between the sink, stove, and refrigerator. Insufficient clearance, below the 42-inch minimum for walkways or islands, restricts movement and creates congestion when more than one person uses the kitchen. A layout that routes a main household traffic path directly through the work triangle disrupts cooking tasks and increases collision risk between the cook and passing household members.
Inadequate storage planning, such as insufficient cabinet or pantry space for the household’s needs, often results from prioritizing counter space or an island over functional storage capacity. Ignoring existing plumbing, gas, or electrical line locations during layout planning can significantly increase renovation costs when a chosen layout requires relocating these utilities.
How to Choose the Right Kitchen Layout for Your Space
Choosing the right kitchen layout starts with measuring the available room dimensions, identifying existing plumbing and electrical locations, and determining the number of people who will use the kitchen simultaneously. These factors narrow the layout options to those that fit the room’s physical constraints.
Room width and depth determine whether a one-wall, galley, L-shaped, U-shaped, G-shaped, or island layout is structurally feasible, based on the minimum widths and clearances outlined for each layout type. The location of existing water, gas, and electrical lines affects renovation cost, since relocating a sink or stove to a new position typically increases the project budget compared with keeping these elements in their current locations.
Household size and cooking habits influence whether a single-cook layout, such as a galley or one-wall kitchen, or a multi-cook layout, such as a U-shaped or island kitchen, better serves daily use. A household that frequently entertains may prioritize an open-concept layout with strong flow to a living or dining area, while a household that prioritizes contained cooking activity may prefer a closed layout. Budget constraints also affect the choice, since layouts requiring structural changes, wall removal, or utility relocation generally cost more than layouts that retain the existing room configuration.
Kitchen Design Styles at a Glance
Kitchen design style refers to the visual and material choices applied within a chosen layout, including cabinetry finish, countertop material, hardware, and color palette. Style operates independently of layout type, since any of the six layout types can be finished in a range of design styles.
Common kitchen design styles include modern, traditional, farmhouse, transitional, industrial, and minimalist. A modern style typically uses flat-panel cabinetry, minimal hardware, and a neutral color palette. A traditional style typically uses raised-panel cabinetry, decorative molding, and warmer wood tones. A farmhouse style typically combines a apron-front sink, shaker-style cabinetry, and natural materials such as wood and stone. A transitional style blends elements of modern and traditional design, using simpler cabinetry lines with some decorative detailing. An industrial style typically uses exposed materials such as metal, concrete, and brick alongside utilitarian fixtures. A minimalist style emphasizes clean lines, hidden storage, and a reduced material palette.
The chosen design style affects material selection, hardware, and finish decisions within the layout but does not change the functional dimensions, clearances, or work triangle principles established by the layout type itself.